Administration
You can use a Microsoft Management Console snap-in to administer Boomerang settings remotely from your computer or directly on the host computer where Boomerang Services are deployed via RDP connection. For more information on configuring Boomerang for remote access click here
The Boomerang MMC snap-in allows you to:
- Connect to servers where Boomerang Services are installed
- Manage Boomerang database connection settings
- Manage Boomerang Services run-time parameters
- Start/stop and change security for Boomerang Services
- Add, remove Boomerang Print Service printer objects and configure default printing preferences
- Add, remove Boomerang Fax Service fax objects and configure default page preferences
- Automatically update CODE_FILE as you manage printer and fax server objects
- Browse and filter Boomerang Services Windows Application event log
- Monitor activities
Each one of the five services is represented by a branch with corresponding icon. In addition to this you will also find the service log containing all events occurred from each of the four services. General settings and service specific settings will be displayed on the right hand side of the console once chosen.

Changing the Service Account
During the installation a service account is assigned and will be shown under Properties (right click on the server node and select Properties.) After changing these settings the services needs to be restarted to the new credentials to be used. Please note that the account specified needs to have full access to log-on and all objects in the Boomerang database.

General Settings
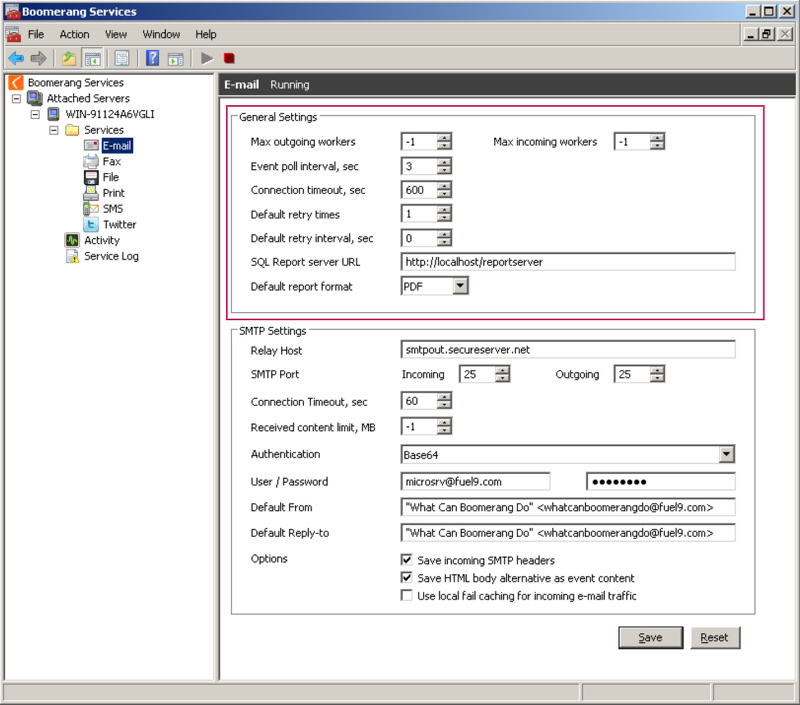
Max Outgoing/Incoming Workers
Boomerang is Multithreading application meaning that it will processes multiple jobs simultaneously. A value of -1 in these fields will give the maximum number of threads allowed by the Windows host machine. To limit the how much processing power should be allowed to Boomerang a value of 1 or more could be entered for outgoing and incoming events. Default values (Enterprise edition) are -1.
Event Poll Interval
The Event poll interval specifics how often Boomerang should check for new event (jobs) not yet processed. Default value is 3 seconds.
Connection Timeout
Connection timeout specifies the database connection timeout. Default value is 600 seconds.
Default Retry Times
A default number of retries may be set for all jobs in case of system failures like a non responding SMTP server. This setting may be overridden on individual jobs, see EVENT_STATUS for more information. Logical failures like a incorrect SSRS path will not trigger a retry. See EVENT_LOG for more information. Default value is 1.
Default Retry Interval
This setting specifies how much time in seconds that should elapse between each retry. Default value is 0 seconds.
SQL Report Server URL
SQL Report Server URL is the address to the Report Server where the SSRS web services (.asmx) resides. In a typical SSRS installation the URL should be http://mydomain/reportserver. Note: not to be confused with the Report Manager address.
Default Report Format
When including content from SSRS a default format may be specified here. See Format section in EVENT_CONTENT for more information. Default value is PDF.
SMTP Settings

Relay Host
Enter DNS name or IP address to the SMTP server that should be used by Boomerangs email service.
SMTP Port
Specify incoming and outgoing SMTP ports. Typically port 25 is used.
Connection Timeout
Specify the number of seconds Boomerangs email services should try to connect to the specified relay host before timing out.
Received content limit
Enter the maximum email attachment size that is allowed. Incoming (inbound) email attachments above this limit will not be saved in table IN_EMAIL_CONTENT. Set the value to -1 to allow any file size. Please note that mail server you are using may also have size limits implemented independently of Boomerang.
Authentication
If the service account used by Boomerang is a domain account with access to the relay host set the Authentication mode to None. If your mail server is hosted by a third party then select Clear Text or Base64 depending on encryption levels supported by your provider. When any of these two options are selected also specify the user name and password.
Default From
Enter the default from email address to be used when sending emails out. You may change the from email address on individual outgoing emails by using dbo.From.OUT_EMAIL field.
Reply To
Enter the default from email address to be used as a reply to address on outgoing emails. You may change the reply to email address on individual outgoing emails by using dbo.ReplyTo.OUT_EMAIL field.
Options
Save Incoming SMTP headers
If checked messages headers for incoming emails will be parsed and stored in IN_EMAIL_HEADER.
See Also
Configuring Email In
Troubleshooting SMTP connections
Fax Settings

File Settings
Incoming file folder
One or more file folders may be specified (separated by semicolon). Specified file folders will continuously be purged of any new files by the File In service in Boomerang. Files are stored in the IN_FILE table.
Managing Printers
Expand server machine node, in the sub-tree click once on Print node, then expand it. Click Printers node underneath Printer node. You should see all printers currently attached to Boomerang Print Service.
Add Printer
To add new printer right-click anywhere in the white space within the printer list, or hit Connect Printer icon in the toolbar at the top of the console. In the pop-up dialog either use the look-up tree to explore network printers or simply type-in the full printer path in case you know it.

The printer should display driver-specific default printing settings dialog similar to this. Choose appropriate settings and click on OK. The printer is now added to Boomerang Services and will use default print settings which you just specified.

Remove Printers
To remove existing printer, highlight it in the list first, then right-click and select All Tasks -> Remove. Alternatively you may hit Remove Printer button in the toolbar at the top of the console or simply hit Del button on your keyboard. Confirm the warning pushing OK button.

Change Printer Properties and Settings
To modify properties for existing printer right-click the printer in the list and choose Properties. Alternatively simply double-click the printer in the list.

In the printer properties dialog you can update description and remarks properties which are then saved to CODE_FILE when either Apply or OK button is pushed. Remarks 1 and 2 may be used by end-user applications in any arbitrary way, such as specify printer purpose and toggle visibility.
To change default printing preferences right-click specific printer in the list and choose All Tasks -> Preferences. Default driver-specific printer settings dialog will show.

Monitoring Activities
The Activity node will show past usage for all or any of the available services. Activity may be monitored by hour, day, 30 days or 365 days. To monitor activities left click on the activity icon. The chart below shows incoming Twitter messages over the last 24 hours.

To change what information to plot right click on the Activity icon and select Properties. Set Range, Source and Series and click on OK or Apply. Auto-refresh is by default set to off. When set to off the chart will only update if the Activity node is selected or by right clicking activity node and selecting Refresh. Auto-refresh set to Slow will update the chart every 10 minutes, set to Fast every 10 seconds.
